Elder Futhark – reused wood & clay tiles

old-futhark
Elder Futhark (Runes)

Most Runic texts are found on hard surfaces such as rock, wood, and metal, and this might explain its angular shape. Because of the resemblance to Mediterranean scripts, it is very likely that Futhark was adapted from either the Greek or Etruscan alphabet. Even though the earliest Runic inscriptions are from the 3rd century CE, its origin may lie much deeper in the pre-history of Northern Europe. …

The Futhark of 24 letters is called “Elder Futhark”, and was used mostly before the 9th century CE. But as languages changed and more Germanic groups adopted it, Futhark changed as well to suit the language that it came to write.

Source: Ancientscripts.com

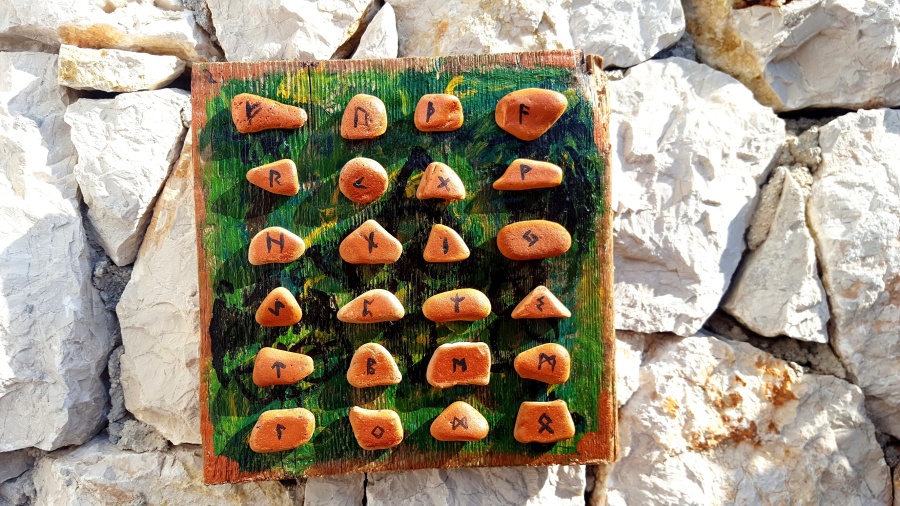
I spent this summer at the seaside as usual, on the Island of Pag , at Croatian Adriatic sea.  I’ve been collecting pieces of driftwood, pebbles, sea shells and other items modeled and shaped by the nature.

As the civilization gradually infiltrates into every bit of this planet, thus the construction sites  invades the shore. But the sea is the builder, the sculptor and the destroyer, so it takes from the land into its  depths then returns something scared, changed but beautiful. Walking down one of this deserted construction sites by the sea, I found pieces of planks, and bricks and roof tiles. But most interesting were those tiles fragments,  modeled and rounded by the sea,  looking like little pebbles. Sea made contemporary everyday objects look like ancient pieces. I wanted to make something with them, something that has an air of history.

So  I thought of runes…

Save

Cottage in the woods (painted tree stump)

Painted tree stump

I am a forest, and a night of dark trees: but he who is not afraid of my darkness, will find banks full of roses under my cypresses.

– Friedrich Nietzsche

Music theme: Cry of the Forest – Forest Elves

This is tree stump I found with several other pieces rot in the rain and sun and open sky. This is pine or spruce, I’m not sure, and still smells beautiful. My association was instant: deep forest and small secluded cottage. I always dreamed of having such small getaway from everyday life.

I removed all the debris, resin, cleaned the stump  well with water and left it to dry. Than I baked it in the oven to kill the microorganisms. When dry I applied some fungicide liquid.

I used acrylic paint and  waterproof wood varnish.

I’m quite happy how it looks in the garden. I think the dog likes it, too. J

Owl – reused wood and stone

20160320_140924

Sticks and stones may break my bones, but words will never hurt me

This piece is made of pine stump, bark and twig. I’ve used that to make a base. I didn’t polish the surface, because I really like the texture of the wood itself as well as the traces of the saw. Bark removal revealed smooth silky wood side, as the contrast to the rough front and back surface. I’ve applied “foresty” colours (shades of green, brown and yellow) on the front and back.

Than it was time for the owl. I had one stone I picked up in my walk. The moment I saw that stone I knew it was going to be the owl one day. So, I grabbed my acrylics and the owl was born!

Finally, I glued on bark, owl, and twig on my base wood and put on some varnish.

Et vóila!  My recycled wood sculpture is here.

Photo gallery of materials and finish piece:

Circles, acrylic paintings

Circles in red and green Circles in red and blue

Those two were made using some construction work leftovers. That goes well with my repurpose-recycle philosophy, I guess.  I always save old or even broken things (to my close ones despair) and have quite a collection of  it.  But, sometimes I find something at my family members houses that trigger my imagination and creativity. This time in my parents shed I found pieces of plywood that used to be cabinet shelves. So, you could say that  piling up runs in the family ;).

For this two pieces I used: old shelves, spackling paste (yes, yes for walls), various palette knives and  household objects. I also used small glass beads.

IMAG1564IMAG1566After applying spackling paste, I made imprints and texture with my “tools”. I left it to dry completely, about 24 hours, then applied first layer of acrylic paint.

IMAG1567IMAG1568After several layers of paint and finishing touch, my work was complete:IMAG1592

Below are pictures of paintings at different light angle and with details of texture.

Circles in red, green and gold

1 1-1 2345

Circles in blue, red and silver

6 6-1

9 7 108

Pinecone flower

This one I really like!

1

I have a bag full of pinecones, waiting for the Christmas time I guess… Then I will make wreaths, Christmas ornaments and other seasonal  items. But one was bigger than others, and caught my attention with top that looked like a flower.

So, I took leftover lath and coco rope:

IMAG1483

Some hot glue and few strokes of acrylic dye later and my wall hanger is finished.

“Prehistoric art” on drift wood

When I saw that imprint on the rock I found on the beach, it reminded me of the fossil pictures I saw on National Geographic. So I thought, let’s go with the flow… and make something prehistoric-like.

2

I had some driftwood and rocks picked earlier.

3

All it needed is some water colors, acrylic paint and finally varnish and voilà!

12016620_10206635540981440_600164686_n

Lighthouse at sunset

1

This wallhanger is made of saved wood.

I found some leftovers of wood on the construction site. I’ve painted it with oil colours, than glued on sea rock. But, the picture seemed somewhat empty. So, I addes sea shell which i’ve converted to little lighthouse with red marker.

Materials:

3 2